Firebase sign-in with Embedded Wallets
Firebase is a popular backend platform that enables developers to integrate authentication, databases, and other services into their applications. Embedded Wallets supports Firebase as an authentication provider, allowing developers to leverage Firebase Authentication within the Web3Auth framework for secure user sign-in and key management.
Firebase supports a wide set of social sign-in providers.
Create a Firebase project
To get started, developers must first create a Firebase project in the Firebase Console. This is a required step before integrating Firebase with Web3Auth. Once the Firebase project is set up, developers can proceed to configure a Firebase connection in the dashboard.
Web3Auth's Firebase integration enables the use of Firebase-issued ID tokens to authenticate users, combining Firebase's authentication flexibility with Web3Auth's decentralized key infrastructure.
For detailed implementation steps and platform-specific instructions, developers can follow the Firebase documentation.





Create a Firebase connection
To use this feature, developers must go to the Custom Connections tab in the dashboard.
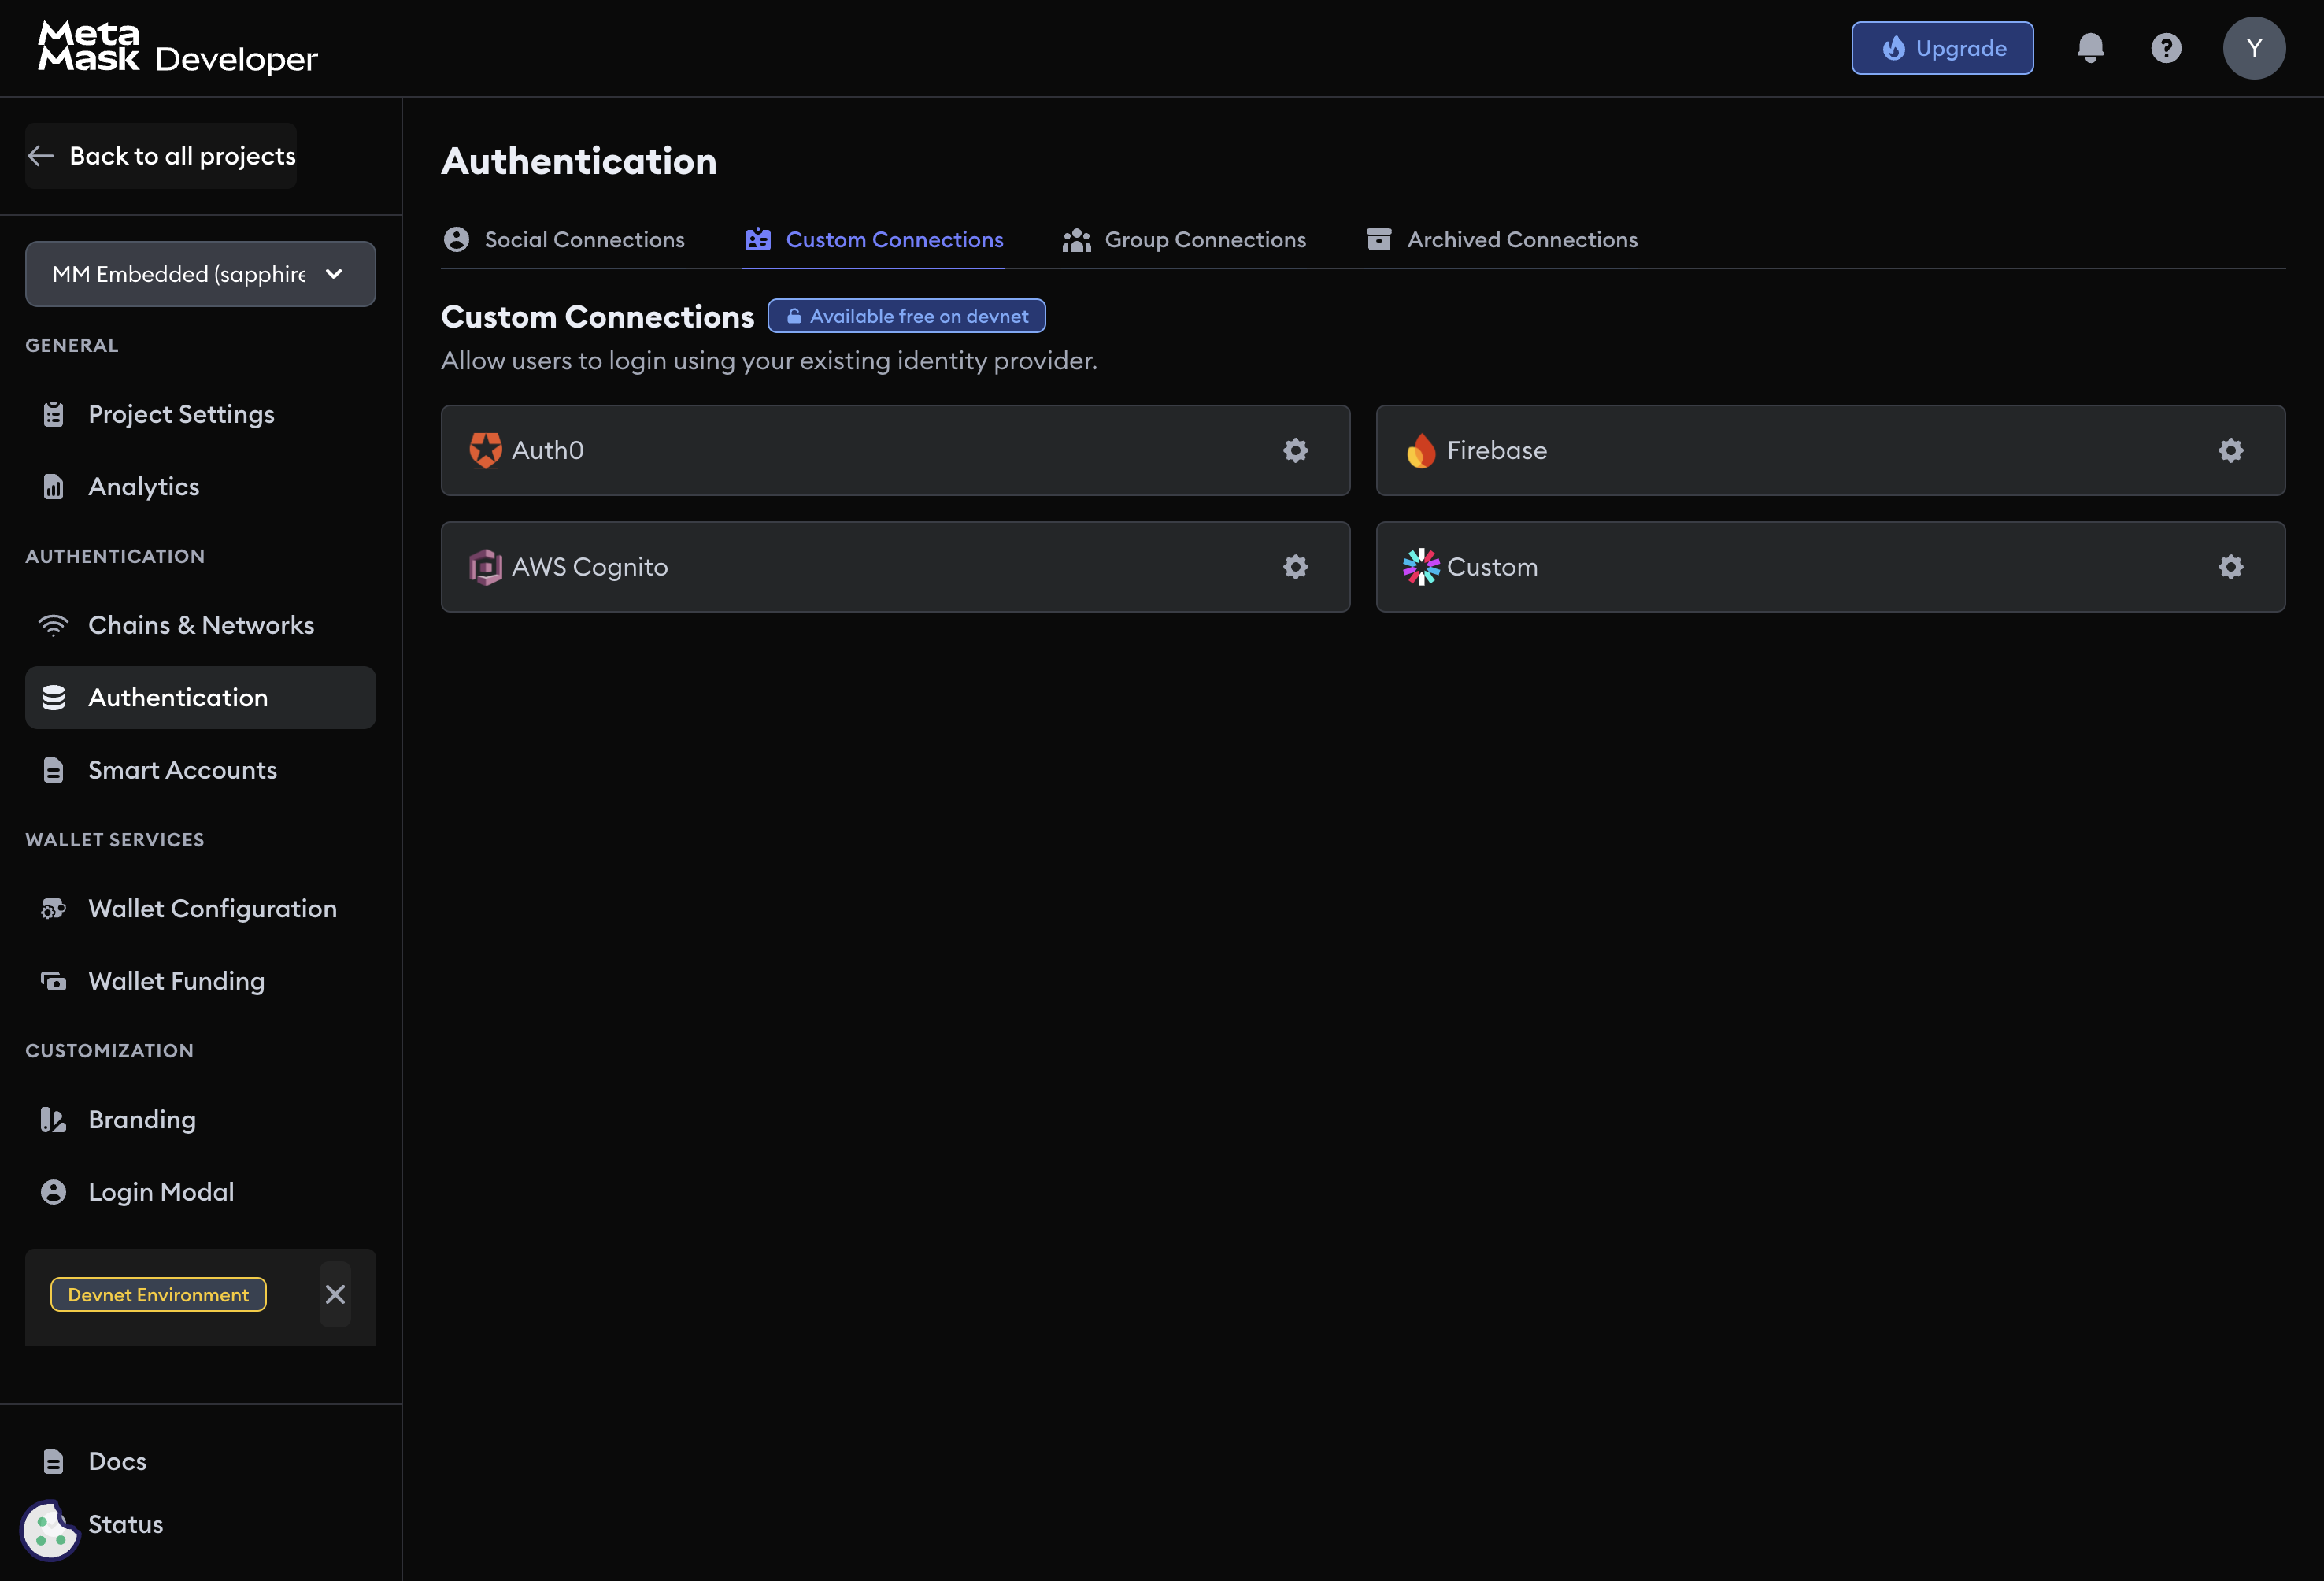
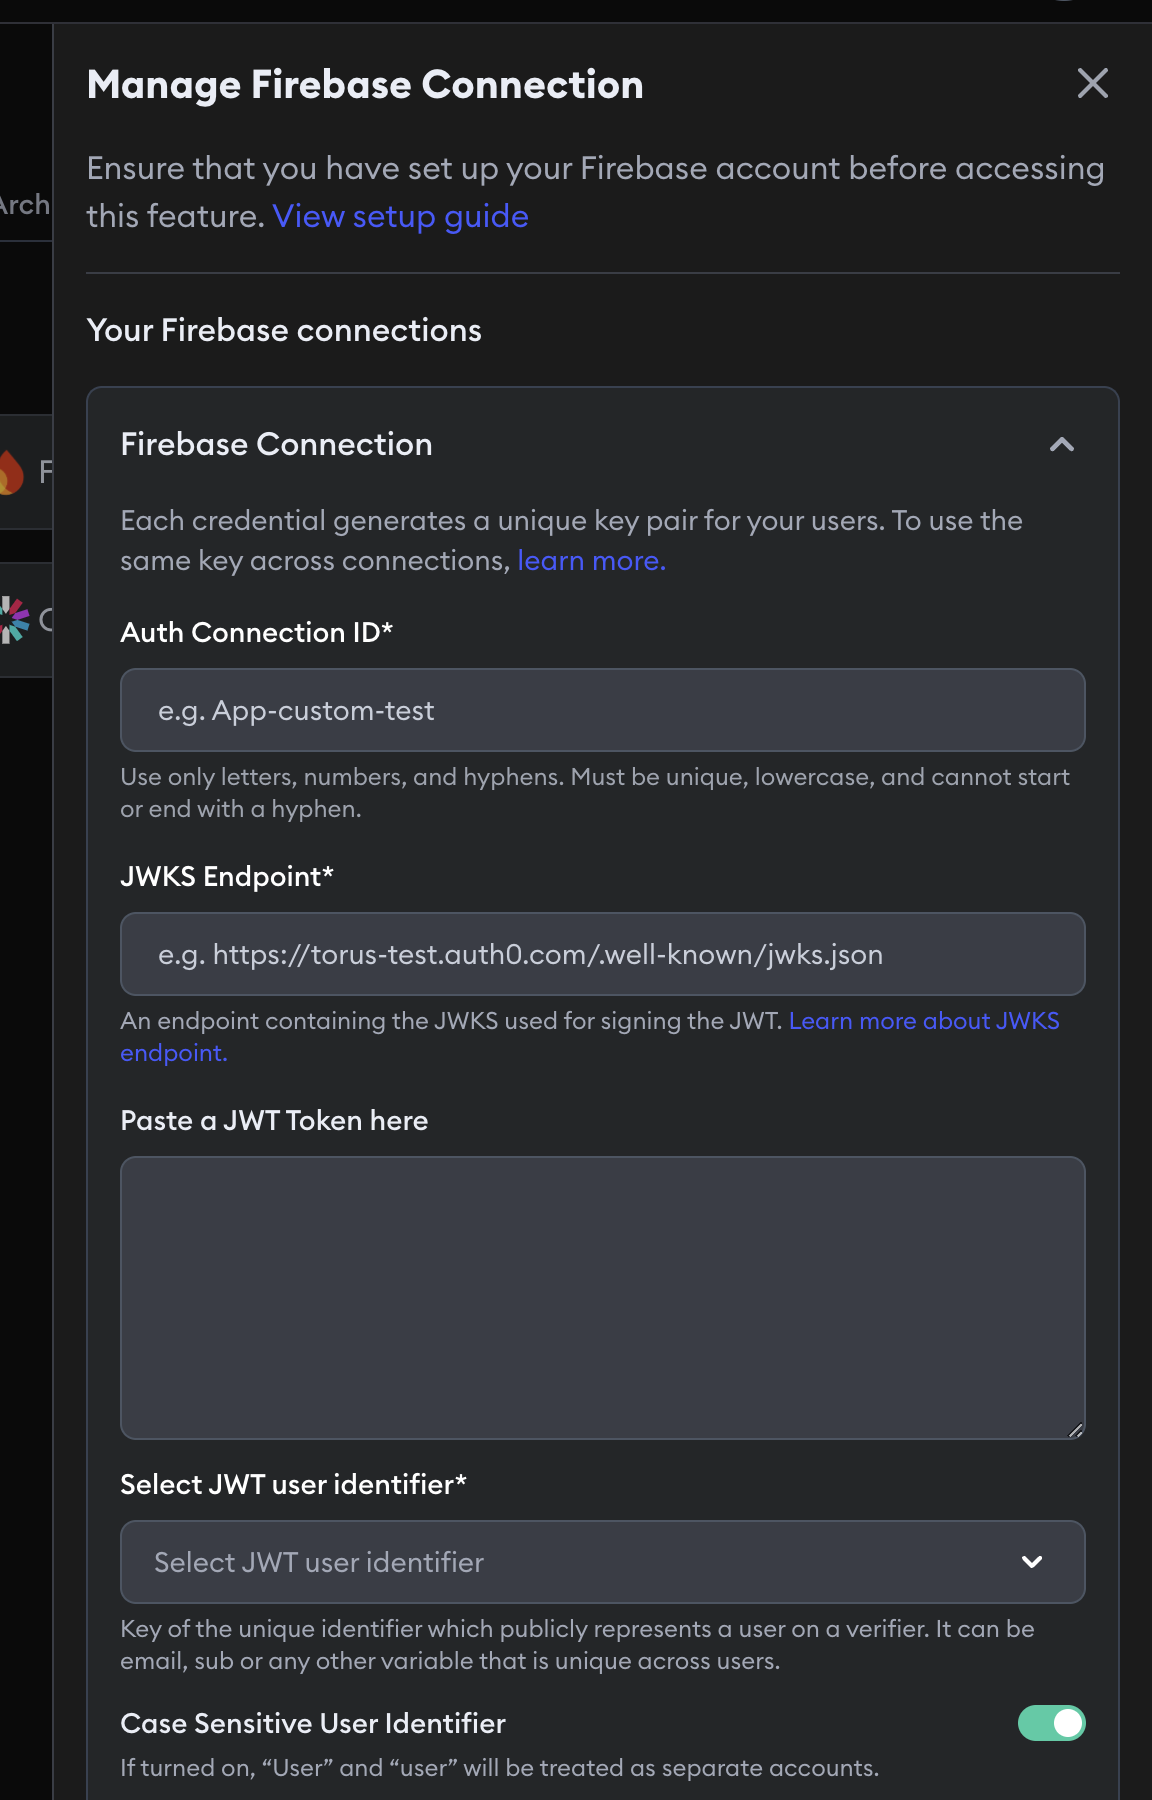
Follow these steps to create a Firebase connection:
- Visit the dashboard.
- Go to the Custom Connections section.
- Click on the Settings icon near the Firebase connection.
- Enter the
Firebase Connection ID. - Paste
https://www.googleapis.com/service_accounts/v1/jwk/securetoken@system.gserviceaccount.comasJWKS Endpoint. - Paste a sample JWT Token to auto populate the best JWT validations possible.
- Select the JWT user identifier:
email,suborcustom. - (Optional) Toggle the case sensitivity of User Identifier.
- Click on Add Custom Validations to add validations manually.
- Type
issas a field andhttps://securetoken.google.com/FIREBASE-PROJECT-IDas a value. - Next, type aud as a field and
FIREBASE-PROJECT-IDas a value.
- Type
- Click on the Add Connection button to save the settings.
Usage
Since the Firebase Connection details are available from the dashboard, developers don't need to pass any additional parameters to the Web3AuthProvider.
Follow our quickstart to set up the basic flow.
Web
const loginWithFirebaseGithub = async () => {
  try {
    const app = initializeApp(firebaseConfig)
    const auth = getAuth(app)
    const githubProvider = new GithubAuthProvider()

    const result = await signInWithPopup(auth, githubProvider)

    const idToken = await result.user.getIdToken(true)

    connectTo(WALLET_CONNECTORS.AUTH, {
      authConnectionId: 'w3a-firebase-demo',
      authConnection: AUTH_CONNECTION.CUSTOM,
      idToken,
      extraLoginOptions: {
        isUserIdCaseSensitive: false,
      },
    })
  } catch (error) {
    console.error('Firebase authentication error:', error)
  }
}
Android
Create a Web3Auth instance
In your activity, create a Web3Auth instance with your Web3Auth project's configurations.
web3Auth = Web3Auth(
  Web3AuthOptions(
    clientId = getString(R.string.web3auth_project_id), // pass over your Web3Auth Client ID from Embedded Wallets dashboard
    web3AuthNetwork = Web3AuthNetwork.SAPPHIRE_MAINNET,
    redirectUrl = "{YOUR_APP_PACKAGE_NAME}://auth", // your app's redirect URL
    authConnectionConfig = listOf(
      AuthConnectionConfig(
        authConnection = AuthConnection.CUSTOM,
        authConnectionId = "web3auth-firebase-examples",
        clientId = getString(R.string.web3auth_project_id)
      )
    )
  ),
  this
)

// Handle user signing in when app is not alive
web3Auth.setResultUrl(intent?.data)
Signing in
Once initialized, you can use the web3Auth.connectTo(LoginParams(...)) function to authenticate the user when they click the sign-in button.
private fun signIn() {
  auth = Firebase.auth
  auth.signInWithEmailAndPassword("android@firebase.com", "Android@Web3Auth")
    .addOnCompleteListener(this) { task ->
        if (task.isSuccessful) {
            // Sign in success, update UI with the signed-in user's information
            Log.d(TAG, "signInWithEmail:success")
            val user = auth.currentUser
            user!!.getIdToken(true).addOnSuccessListener { result ->
                val idToken = result.token

                Log.d(TAG, "GetTokenResult result = $idToken")
                val loginCompletableFuture: CompletableFuture<Web3AuthResponse> = web3Auth.connectTo(
                  LoginParams(
                    authConnection = AuthConnection.CUSTOM,
                    authConnectionId = "web3auth-firebase-examples",
                    idToken = idToken
                  )
                )

                loginCompletableFuture.whenComplete { loginResponse, error ->
                    if (error == null) {
                        println(loginResponse)
                        reRender(loginResponse)
                    } else {
                        Log.d("MainActivity_Web3Auth", error.message ?: "Something went wrong" )
                    }
                }
            }
        } else {
            // If sign in fails, display a message to the user.
            Log.w(TAG, "signInWithEmail:failure", task.exception)
            Toast.makeText(baseContext, "Authentication failed.",
                Toast.LENGTH_SHORT).show()

        }
    }
}
When connecting, the connectTo function takes the LoginParams arguments for sign-in. See the LoginParams for more details.
Flutter
Create a Web3Auth instance
In your main.dart file, initialize the Web3AuthFlutter plugin at the start of your app, such as in the overridden initState function
void initState() {
super.initState();
initPlatformState();
}
Future<void> initPlatformState() async {
final Uri redirectUrl;
if (Platform.isAndroid) {
redirectUrl = Uri.parse('{SCHEME}://{HOST}/auth');
} else if (Platform.isIOS) {
redirectUrl = Uri.parse('{bundleId}://auth');
} else {
throw UnKnownException('Unknown platform');
}
final loginConfig = HashMap<String, LoginConfigItem>();
loginConfig['jwt'] = LoginConfigItem(
verifier: "VERIFIER_NAME", // get it from MetaMask Developer Dashboard
typeOfLogin: TypeOfLogin.jwt,
name: "Firebase JWT Login",
clientId: "WEB3AUTH_CLIENT_ID", // web3auth's plug and play client id
);
await Web3AuthFlutter.init(
Web3AuthOptions(
clientId:'YOUR WEB3AUTH CLIENT ID FROM DASHBOARD',
network: Network.cyan,
redirectUri: redirectUrl,
loginConfig: loginConfig,
)
);
await Web3AuthFlutter.initialize();
}
Logging in
Once initialized, you can use the Web3AuthFlutter.login(LoginParams( loginProvider: Provider.google )) function to authenticate the user when they click the sign-in button.
Future<Web3AuthResponse> _withJWT() async {
  String idToken = "";
  try {
    final credential = await FirebaseAuth.instance.signInWithEmailAndPassword(
      email: 'custom+id_token@firebase.login',
      password: 'Welcome@W3A',
    );

    idToken = await credential.user?.getIdToken(true) ?? '';
  } on FirebaseAuthException catch (e) {
    if (e.code == 'user-not-found') {
      log('No user found for that email.');
    } else if (e.code == 'wrong-password') {
      log('Wrong password provided for that user.');
    }
  }

  return Web3AuthFlutter.login(
    LoginParams(
      loginProvider: Provider.jwt,
      extraLoginOptions: ExtraLoginOptions(
        id_token: idToken,
        domain: 'firebase',
      ),
    ),
  );
}
Read more about initializing the Flutter SDK here.
React Native
const web3auth = new Web3Auth(WebBrowser, SecureStore, {
  clientId,
  network: OPENLOGIN_NETWORK.SAPPHIRE_MAINNET, // SAPPHIRE_MAINNET or SAPPHIRE_DEVNET
  loginConfig: {
    jwt: {
      verifier: 'YOUR_JWT_VERIFIER_NAME', // Please create a verifier on the developer dashboard and pass the name here
      typeOfLogin: 'jwt',
    },
  },
})
import auth from '@react-native-firebase/auth'
import { GoogleSignin } from '@react-native-google-signin/google-signin'

async function signInWithFirebase() {
  try {
    GoogleSignin.configure({
      webClientId: '461819774167-5iv443bdf5a6pnr2drt4tubaph270obl.apps.googleusercontent.com',
    })
    // Check if your device supports Google Play
    await GoogleSignin.hasPlayServices({ showPlayServicesUpdateDialog: true })
    // Get the user's ID token
    const { idToken } = await GoogleSignin.signIn()
    // Create a Google credential with the token
    const googleCredential = auth.GoogleAuthProvider.credential(idToken)

    // Sign-in the user with the credential
    const res = await auth().signInWithCredential(googleCredential)

    const idToken = await res.user.getIdToken(true)

    await web3auth.login({
      redirectUrl: resolvedRedirectUrl,
      mfaLevel: 'default', // Pass on the MFA level of your choice: default, optional, mandatory, none
      loginProvider: 'jwt',
      extraLoginOptions: {
        id_token: idToken,
        verifierIdField: 'sub', // same as your JWT Verifier ID on the dashboard
      },
    })
  } catch (error) {
    console.error(error)
  }
}